Playroom Wall Art, Part 1

I have two little boys and I am married to a Lego master builder (seriously, his creations really put mine to shame), so you can imagine that Legos rule at our house. Early on in the "little" Lego phase I decided to keep the boxes to make something out of them. Really after purchasing all the Legos, who has any money left to decorate the Lego room that will be required for housing all of said Legos?!?!? I decided that foam core board could make frames of all different shapes and sizes (like the boxes) and I love how it turned out!
Supplies
- Lego boxes (or other toy boxes)
- Foam Core Board, 20 inch x 30 inch (I used four sheets of black)
- Hot Knife with Cutting Blade
- Ruler
- Speed Square (optional)
- Pencil
- Hot Glue Gun
- Packing Tape (optional)
Instructions
Before getting started you should consider how much time you have and if the project can be left out until you can get back to it. I worked on my frames for several hours over several days on the kitchen island. Not ideal since I had to keep picking it up, but it was a nice big surface to work on.
Save boxes from Legos or other toys with fun pictures on them.
Cut the side off the box with the desired picture to frame, but not too close to the picture you want to frame. Leave a minimum of 1/4" for the frame to attach to the box or some of the picture will be covered. For small boxes a heavy duty paper cutter helps, but good scissors will also do the trick.
Decide how wide you want the frame's border - mine range from 1" to 2" depending on the artwork on the box and the size of foam core available (I tried to use as much of each board as possible). Since all the boxes are different sizes, I thought the variety of frame sizes worked. I made 17 frames out of (4) foam core boards, with plenty to spare and a few mess ups.
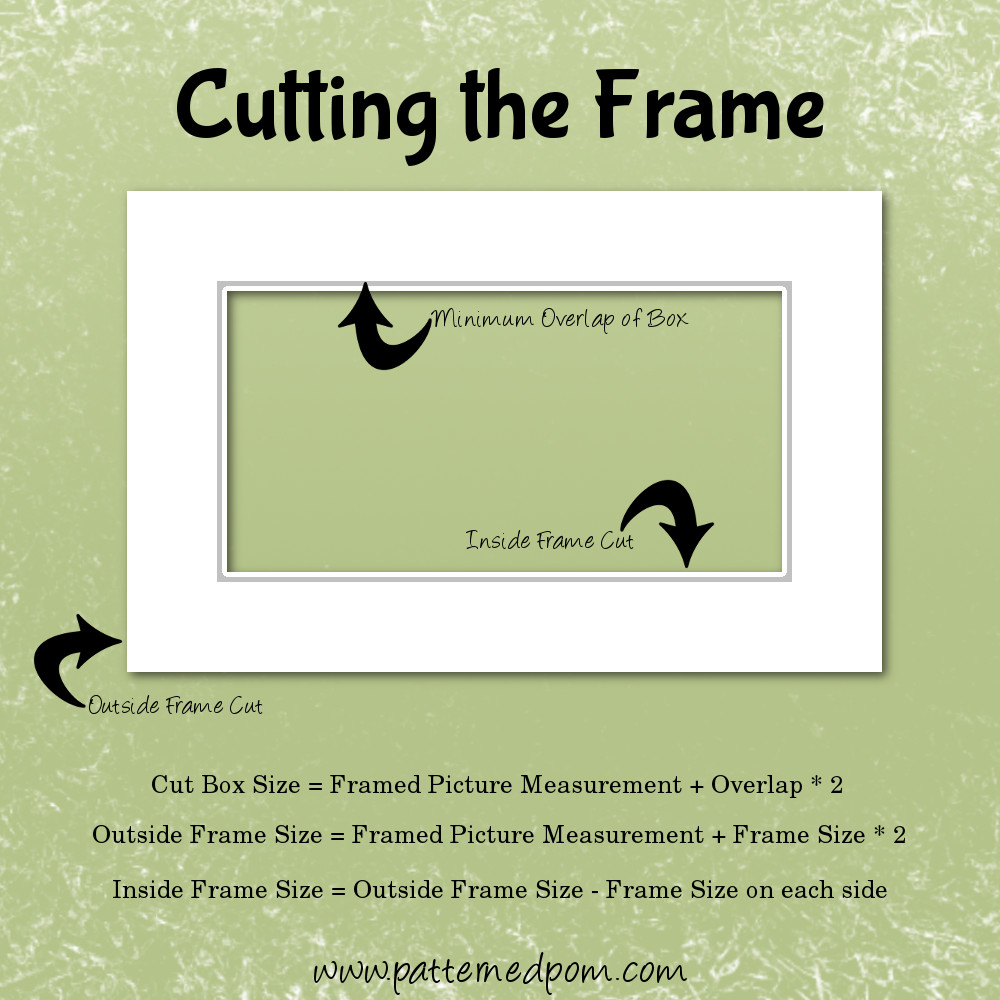
The math to complete the cutting on the frames is not super complicated, but does require some thought. Click here for a graphic if the words are confusing! First you need to find out what part of the box picture you want to show through the frame, which will be your "Framed Picture Measurement". Take the "Framed Picture Measurement" and add a minimum of 1/4" (or more) to every side that is your "Cut Box Size". Use the "Framed Picture Measurement" and add the frame size for both sides (so 2" frame would add 4" each direction). Do this for both length and width. This will be your "Outside Frame Size". Then mark back in from your "Outside Frame Size" the frame size on both the length and width on all sides. This will ensure the opening is centered. This inside box will be the "Inside Frame Size". I did all the marking on one side and used the unmarked side for the frame front of the frame.
Turn on the hot knife and wait until heated before starting. Here are some helpful hints for using the hot knife:
- Make sure the knife is hot - I could feel the heat coming off of it without being very close. If you find you have to use a lot of pressure to get it to cut, it is not hot enough. It will cut the foam core with minimal effort on your part, just guiding the cut. It should feel like slicing jello.
- Take your time to make a slow light cut through the top layer of paper on your first pass. This will make a very nice guide for the second cut. You will hear the top paper of the foam core make a sound like tearing paper on the way down.
- On the second cut make sure you get all the way through to the bottom paper (I usually lifted the foam core up to make this cut to make sure it was not cutting anything below - you know like the counter). You will hear the same tearing paper sound if you are getting the bottom layer. Keep this cut moving, or it will melt away the interior "core" section (this is why the first cut is helpful - the guide makes it easy to cut the second pass a little faster).
- Flip over when done to make sure the corners are completely cut before trying to press out the middle. Carefully cut them if they are not and the piece should fall out.
Once your pieces are cut (if making a lot make sure to keep track of which box goes with which frame), fire up the glue gun. When it is ready, line up your boxes and frames and carefully glue. I found my glue dried really fast when trying to do lines along large boxes, so I tried to mainly get the corners for position and then filled in where I could get my glue gun nozzle in between the box and frame. I also decided that since my boys tend to be rather wild and these may get knocked around, I may need a backup option for keeping them in place, so I added strips of packing tape to the back of each just as an extra precaution.
It gets easier as you do more of them. I probably wasted about one whole sheet of foam core board with mess ups! Fortunately at $1 a piece, I wasn't out too much. Once you have made a bunch, you are ready for hanging! See my post here for hanging and the final photo of how our Playroom Wall Art turned out!
{This post includes one affiliate link. I only link to items that my husband and I actually own, use, and love.}