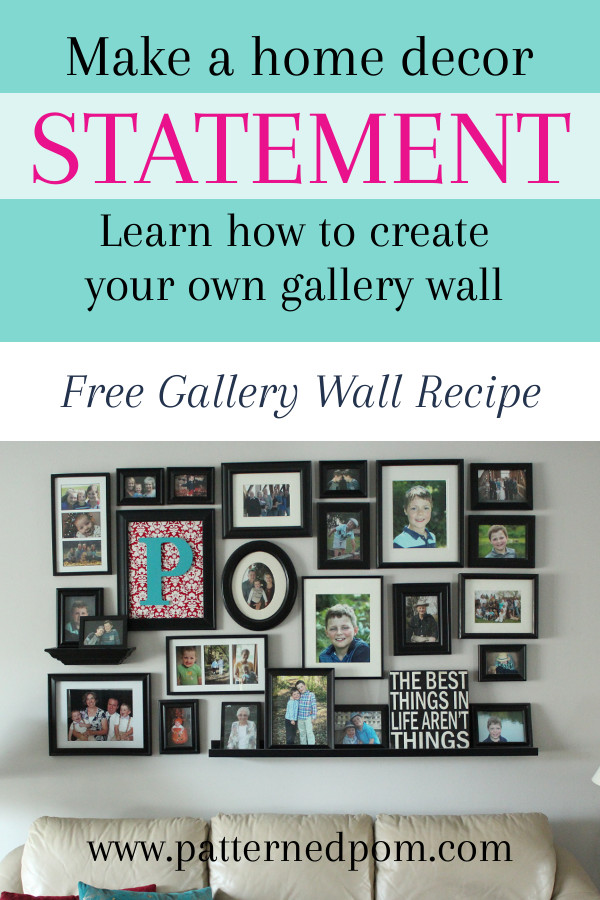
Make a Statement with a Gallery Wall
Everyone who enters my house always comments on the gallery wall I have in the living room over the couch - and not just because it showcases my handsome boys. It is the eye catching focal point of the room and easily seen after entering the front door, so it is noticed.
I will admit that I painstakingly spent 6 months working on the layout of this gallery wall, but it was worth it for the statement it makes for the room. And that isn't even the best part; the way I created it allows me to swap what is on the wall without having to change any of the frames or put more nails in the wall! Before you decide to quit already, I have lots of things to help you on your journey including a gallery wall recipe (link below).
If you are thinking of making your own gallery wall, here are some things to consider before getting started.
What do you want to include
I use my gallery wall for a mix of older and current family photos (so I can keep my favorite baby photos on display while still showing current photos too). Maybe you would like a mix of family photos and decor that goes with the room. Or is your style a classic black and white photo display. How about a full display of your kids artwork in their playroom? Whatever you choose is up to your taste, style, and function of the space. Just keep this in mind for the next steps.
Color of your frames
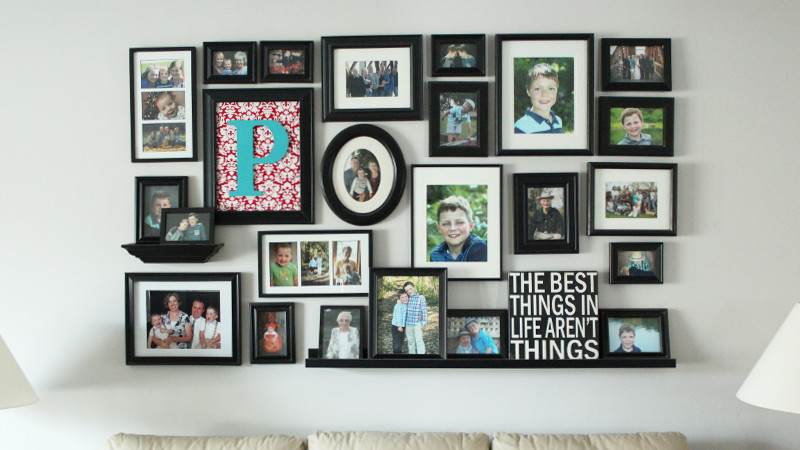
I like to choose either black or white, but not necessarily all matched frames (like a ready to hang gallery wall set). This way if something happens and I need to swap out a frame I can easily add in a new frame without it looking odd because it is the only different one. Plus, you will surely be able to find black or white frames forever as they are timeless. Mine has frames from Ikea, Goodwill, Michaels, old ones I had, and a few pieces from a large set.
How big is your space
My gallery wall is pretty big - 69" wide by 42" tall....ok HUGE! The placement of the frames into somewhat of a rectangle shape and being rather close together makes the whole thing read as one big piece rather than 27 small pieces. One mistake I see a lot on gallery walls is spacing things way too far apart - forcing you to individually look at each piece. I like them cuddled together and be seen all in one look.
Our living room wall is very long, especially as you see it from the entry door, it needed something to define the living room space with big impact. You can absolutely arrange smaller gallery walls and still make a statement! So measure your space and see what you what you have to work with.
What is your Style
I love all things modern with clean lines, but with punches of color and pattern. That is my overall style. So the crisp black frames and rectangular outline of the photo wall and the touch of pattern and color in the "P" art, works for me.
Maybe your style is more free flowing or bohemian. That is great! Add a dream catcher, arrows, greenery, or a place for fresh flowers. Make this about what you LOVE, not what is trending on Pinterest. Because I know I LOVE modern and how I made this gallery wall, I don't intend on changing it for a very long time- if ever.....it is made to be updated easily as is.
Start Planning
Once you have defined your space and style, decide how you are going to incorporate that into the gallery wall. I recommend getting or gathering a few things that you know you want on the wall and start laying it out.
Pro tip: If you have the space to lay all the frames and accessories out on a seldom used guest bed or dining room table, mark of the measured space you have on there and start playing with your layout. If you can leave it there and come back to it to see if with fresh eyes another time or day that will help in determining the best layout.
Once you are starting to figure out your layout, grab the rest of the items you need (like I ended up adding the long frames with the 3 photo openings later in my process to fill the space). Maybe it will be a square or circle frame or a skinny colorful arrow accessory for yours.
Pro tip: Once you are happy with the layout, take a photo from as straight on as you can (grab a stool or selfie stick or whatever to get high) and get a final overall view like it being on a wall...before totally committing to it!
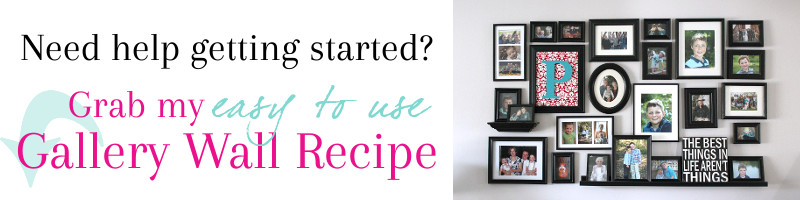
Not sure if you quite understand how to put together the gallery wall? Grab my easy to use Gallery Wall Recipe! It includes directions on how to choose each kind and size of frame and how to incorporate the other accessories.
SUBSCRIBE AND GET THE FREE GALLERY WALL RECIPE
We use Mailchimp as our marketing platform. By clicking to subscribe, you acknowledge that your information will be transferred to Mailchimp for processing. Learn more about Mailchimp's privacy practices here
Ready to Hang
Hanging is always the hardest part, but don't rush it! My best advice is to transfer the frame/accessory information to a large piece of paper (even the back of large wrapping paper will work). By transfer, I mean trace and outline around each frame and element to go on the wall. Make sure you mark a line on the top of the page that is level with the frames. Then MEASURE the exact locations of the hangers on the back and mark that within each of the outlines of the frames. Seriously, take your time with this. It will make the next step so easy!
Now that your large piece of paper is all marked, take this paper and hang it on the wall in the desired location with painters tape. Make sure the paper is straight by using a level with a line you marked above. Then go to town adding nails or hooks on all your marks for the hooks on the frames. Leave the paper in place, just nail through it.
Once complete, pull off the paper. Remember that photo you took of the layout - reference it when you go to hang everything on your brand new, totally awesome gallery wall.
Now sit back and enjoy your hard work!